Most people buy a USB audio interface because a USB microphone sounded thin, then discover the hard part was never the box. It was the setup. A USB audio interface setup comes down to four decisions: which input you use, how much gain you apply, how you monitor, and how the signal gets back out to a computer, a guest, or a livestream. Get those four right and a two-input interface will track a vocal, a guitar, and a two-person podcast without drama.
I have been recording in a small home studio for ten years, tracking everything from solo voiceovers to full bands, and the same mistakes repeat across every price bracket. The interface changes. The mistakes do not. People plug a condenser mic into a channel with the gain at zero and wonder why the take is quiet. They monitor through software, hear a slapback, and blame the box. They buy eight inputs for a two-person show and use two of them.
This guide is built around two specific boxes: a two-input interface for recording, and a compact fader mixer for riding levels once the recording turns into a livestream. Both sit in the entry bracket. Neither is a toy. Here is how to wire them, gain-stage them, and keep the noise floor where it belongs.
Why you should trust me
I have been an engineer in Nashville for a decade. My day job is tracking other people's records, and my night job is recording my own material on gear that costs less than a single session fee at the big room. I started on a cheap two-input interface, and I still keep a drawer full of dead ones with fried headphone jacks, which taught me more about what matters than any spec sheet.
The things I check first are boring: do the preamps stay clean when you push them, do the drivers behave after a reboot, does the headphone amp drive high-impedance cans, and does the whole thing hold up for a three-hour session without dropping out. Everything else is marketing.
How I chose the gear in this guide
This is not a list of the best interfaces on the market. It is the short list of gear a two-input, one-person setup actually needs, chosen against four rules.
First, the preamps have to stay usable at high gain, because a quiet dynamic mic is the hardest load you will ever put on an entry-level interface. Second, the conversion has to be better than the microphone, or you are paying for a bottleneck. Third, the driver has to exist and be maintained, because a great chip with abandoned software is a paperweight. Fourth, there has to be a physical control for level. Riding a fader with your hand while you talk beats dragging a mouse with your elbow.
The interface below covers the recording half. The mixer covers the control half.
The gear this setup is built around
Two boxes, two jobs. The interface gets the microphone into the computer cleanly. The mixer gives you a hand on the level while the computer is busy.
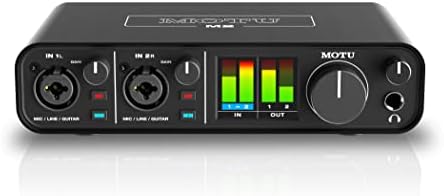
The recording interface: Behringer UMC202HD Audiophile 2x2, 24-Bit/192 kHz USB Audio Interface with Midas Mic Preamplifiers | For Recording Microphones and Instruments
 Visit on Amazon →
This is the recording half of the setup: two inputs, two outputs, 24-bit conversion up to 192 kHz, and Midas mic preamplifiers, which is the part that matters. In this price class you are usually choosing between a clean preamp and a loud one. The Midas preamps are the reason this box keeps showing up in beginner rigs that outgrow their owners.
The 2x2 layout is the honest layout for a solo or duo setup. One channel for the microphone, one for the instrument, both captured at once if you want them. Two outputs for a pair of monitors. Nothing on the panel you will never touch, which is a feature, not a compromise.
Check current Amazon price before you buy, because this model goes in and out of stock and the number moves with it.
Flaws but not dealbreakers: Budget interfaces in this class are not famous for polished driver software. Plan on installing the manufacturer's driver on Windows, checking for updates, and rebooting once before your first session. If your settings reset after a reboot, that is a driver quirk, not a broken unit.
Anyone recording one or two sources at a time will get years out of this. If you need to track a drum kit, you need more inputs, and this is the wrong box.
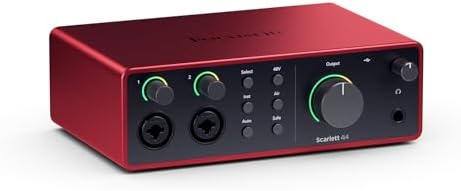
The level control: FIFINE Ampligame SC3 Gaming Audio Mixer with Indi-Fader and Volume Control
 Visit on Amazon →
The second box is the one that keeps a livestream from sounding like a livestream. The FIFINE Ampligame SC3 is a compact mixer built around a physical fader and a volume control, which means your hand can pull the mic down when you cough without you alt-tabbing into a software mixer and hoping you grabbed the right slider.
That sounds like a small thing. It is not. Every stream that sounds smooth has someone riding levels in real time, and a fader is the cheapest version of that skill. The Indi-Fader gives you a hardware handle on the signal, and the volume control handles the rest of the chain, so the computer can keep doing the heavy lifting while you do the mixing.
Check current Amazon price, and confirm what you need it to accept before ordering, because mixers in this category vary in how they expect to be fed.
Flaws but not dealbreakers: This is a control surface for your levels, not a recording interface and not a replacement for a DAW. Treat it as the fader you wish your interface had, and it earns its place on the desk.
Anyone streaming, podcasting, or recording commentary over gameplay will use it every session.
The setup, step by step
Now the part that actually decides whether your recordings sound clean.
Step one: install the software before the hardware. On Windows, download and install the manufacturer's driver first, then plug the interface in and let it finish. On macOS, most two-input interfaces are class compliant and will appear without a driver, but check anyway. Plug in first and install second, and you can end up with the operating system's generic driver holding the device, which is the usual cause of a mysterious latency problem.
Step two: set the sample rate and the buffer. For almost everything, 24-bit at 48 kHz is the right answer. It is what most delivery formats use, it keeps files manageable, and it leaves your CPU room for plugins. If you are tracking something with heavy processing, 96 kHz is a reasonable step up. The 192 kHz ceiling on the interface is real, but it doubles and quadruples file sizes and CPU load for a difference most listeners will never hear.
Set the buffer low for tracking, around 128 samples, and higher for mixing, 512 or 1024. Low buffer means low latency. High buffer means more plugins without crackling. You cannot have both at once, so change it when the job changes.
Step three: gain stage before anything else. This is 80 percent of a good recording. Connect the microphone, put on headphones, and speak or play at the volume you will actually perform at. Raise the gain knob slowly until the loudest peaks land around -12 to -6 dBFS on the meter. That is the sweet spot: loud enough to sit above the noise floor, quiet enough that a surprise note will not clip.
If the clip light blinks, you went too far. Pull back. Digital clipping is not warm, it is broken, and no plugin repairs it after the fact.
Step four: phantom power, only when you need it. Condenser microphones need phantom power. Most dynamic microphones and all ribbon microphones do not, and sending phantom power to a ribbon is a good way to ruin an expensive day. Turn monitors down or mute the channel before you toggle it, because it makes a pop your ears will remember.
Step five: pick one monitoring path. Direct monitoring sends the input straight to your headphones with essentially no delay. Software monitoring sends it through the computer and back, which is what lets you hear reverb or compression while you sing. Both have a place. What you never do is run both at once, because the tiny timing difference between them creates a hollow, phasey sound people describe as "the interface sounds bad."
Start with direct monitoring. Switch to software monitoring when you need to hear the effect.
Step six: test the headphone amp with the hardest load you own. High-impedance headphones need voltage, and entry-level interfaces do not always have it. If your 250-ohm cans sound thin and quiet with the knob all the way up, the interface is not broken, it is out of headroom. A dedicated headphone amp solves it.
Step seven: put the mixer in the chain. Set the interface's output to a fixed level, then let the fader handle the rest. Feed the mixer what you want to control, connect your headphones to it if that is where you listen, and park the fader around the middle of its travel so you have room to move in both directions. The point is that one hand movement changes the level and nothing in the software moves.
Step eight: build a mix-minus if you have a guest. A guest needs to hear you and the show, but not themselves, or they will talk into their own delayed voice and get lost. Route everything to them except their own channel. Every podcast that sounds natural has this figured out, and every podcast that sounds like a phone call does not.
Step nine: chase noise before you record, not after. If you hear a hum, check the USB port first, then the cable, then the gain. A laptop on battery and a laptop on a charger can produce different noise floors. Move the interface away from the monitor and the power supply. Turn off phantom power on channels that do not need it. If the noise is a steady buzz that changes when you touch the microphone, you have a grounding issue, not a bad interface.
What this setup will not do
It will not record a drum kit. Two inputs is two inputs, and no amount of clever routing turns them into eight.
It will not make a bad room sound good. An untreated corner with a washing machine behind the wall still shows up in the take. The interface is roughly 10 percent of a recording. The performance, the microphone, the room, and the gain staging carry the rest, and I say that as someone who likes selling interfaces.
It will not fix a driver problem you refuse to troubleshoot. Latency lives in the software layer. If the round trip feels sluggish, lower the buffer, close the browser, and confirm you are running the manufacturer's driver and not the generic one.
Alternatives worth knowing about
The Focusrite Scarlett 2i2 is still the best first interface for most people, and the reason is boring: the drivers behave, which is the highest compliment I can give audio software.
The PreSonus AudioBox is the budget option that refuses to die. I have seen one survive a decade of touring.
The Audient iD14 has the best preamps in its class, and the instrument input alone justifies the price for guitarists.
The Universal Audio Volt is the choice if you want to plug in and sound finished. Its vintage mode is a real trick, not a gimmick.
Skip anything that headlines a bundled professional DAW. You are paying for a license, not for hardware.
What it costs to run
The interface and the mixer both sit in the entry bracket, and current pricing is on the links above. Compare that against a single hour in a commercial studio and the math gets silly fast, because this is a one-time purchase you will use for years.
The real cost is time. Budget an afternoon for the first setup: driver install, sample rate, buffer, gain staging, monitoring, and a noise check. After that it is a two-minute routine every time you sit down. Set the gain so the meter kisses yellow, listen, and record.
That is the whole job. The gear is not the hard part. The order you do things in is.